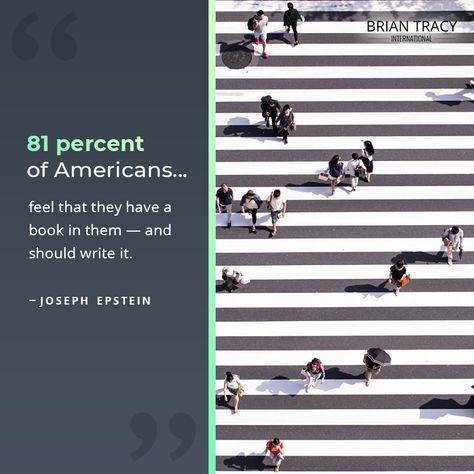
So, you have an idea for a book. Excellent.
Every great novel starts with an idea, but few of those ideas ever make it to bookshelves. Why? Because writing a book from scratch takes a lot of blood, sweat, and tears (and maybe a few bottles of bourbon).
 Fortunately, with some smart planning and disciplined practice, you can take that kernel of an idea and get it onto the page.
Whether all you have right now is a premise, or you’ve made a start and become stuck in a novel writing rut, you’re in the right place. The team of book editors and experts at Invisible Ink have put together this guide to get you from idea stage all the way to a manuscript ready to hit the shelves (or e-libraries).
On that note, Invisible Ink will shortly have more guides for DIY self-publishing and marketing, so be sure to check back soon.
Forming good writing habits
Writing habits aren’t ingrained in us—we have to learn them first.
Even then, some of the most renowned writers in the world are self-proclaimed masters of procrastination.
That’s why setting yourself up with good habits from day one is every bit as important as your storyline.
Become a master of self discipline
There will be days where you don’t want to write. Where the blinking line on your Word document teases you with every second that passes without new words on the page.
Write anyway
Setting up your space
Being organized doesn’t start and stop with your pen and paper (or Word document).
Creating a good writing space can help give you a physical realm where you can enter into the right mental space for your work.
A tidy desk, ergonomic chair, and calm setting are the basic key elements, but think about what sparks inspiration. Perhaps having living things—such as plants or a fish tank—will bring out your muse. Having a bookshelf stocked with your favorite authors and dictionaries can also help alleviate those blank-minded moments.
That said, a good writing area doesn’t have to be a spot in your own home. You can write in libraries, cafes, coworking spaces, and even places such as airports. Your comfort and concentration is what is most important, whatever that means for you.
Pro-tip: Keep a pen and a notepad on hand at all times should genius strike at an unlikely moment.
Tools for writers: What software do you need?
Let’s take a moment to be grateful for the industrial revolution. This was the spark that gave us typewriters, and today, you can easily access novel writing software that Charles Dickens could have only dreamed of.
All you need to do is a little research to make the most of them. Here are some of the most common software tools for writers today:
- Microsoft Word The most common document creator, and a vital tool if you plan to submit your novel to editors, agents, and publishers.
- Scrivener Many writers swear by this organizational document creation tool, ideal for writers who like lots of organization.
- Dropbox A good option if you plan to write on several machines, such as a laptop or desktop. Store all your documents in one place.
- Evernote This tool allows you to take notes, create lists, and to-do lists. A helpful service for those who like everything noted and ordered in one place.
- Hemmingway App A clever app that highlights ways to improve your copy, such as by pointing out passive voice. A good tool for your first draft.
- iMindMap Mind mapping software that helps you create clear, beautiful maps to plan your outline (if you prefer this method).
- Blurt A multi-function writing tool that highlights errors, prevents you from editing your own work too soon, and keeps you focused.
- Dragon Naturally Speaking A voice-to-text tool that transcribes your words up to three times faster than typing. Ideal for getting a lot of words down quickly, but you’ll likely need to do more editing down the line.
Defining your genre and audience
Beginning a novel isn’t about sitting down and simply starting to write—there are a few vital planning steps to take before you can put pen to paper (or fingertips to keyboard).
Your first steps will instead be to make some key decisions and create some form of an outline for your novel. (Don’t worry, pantsers, in your case this will be a very general outline mostly for continuity’s sake.)
Which genre is your novel?
Your spark of an idea might be what inspired you to write a book, but if your goal is to sell it, you’ll have to think about the genre, and by proxy, your audience.
Many writers will stick to genres they love to read themselves, which keeps passion alight and gives them a strong baseline understanding to start from. Others will want to take a step outside their comfort zone and try for a new genre or audience that may not be what they’re used to.
Once you have a firm idea of your genre in mind, take steps to familiarize yourself with it:
- Read popular books within the genre
- Read bad books within the genre
- Read interviews with popular authors in the genre
- Learn about the usual tropes to know what people expect (and how to surprise them)
- Research reviews—what do readers like and dislike about books in this area?
- Put together notes on the typical reader for this genre (age, gender, interests)
As soon as you know your genre and your typical audience member, every tough decision you have to make during writing can often be solved by asking yourself:
“Will my reader enjoy this?”
Become part of a writing community (or three)
Sooner or later, you’ll need to rant, ask for support, bounce ideas around, or simply share your thoughts with a group of people who know exactly what you’re going through. So where can you go to find these communities?
Though there are many Facebook groups for writers out there, few are as active and far-reaching as Twitter. To find these communities, all you need to do is search for some of these hashtags, then start following and interacting with others who use them.
- #WriterCommunity
- #5amWritersClub
- #amWriting
- #WritersLife
- #IndieAuthor
- #Romance #YA #Paranormal (etc)
- #SmashWords
- #WordCount
- #WriteChat
What is NaNoWriMo?
November is National Novel Writing Month, known as NaNoWriMo (there’s another hashtag to look for). Each year, participants strive to write a novel in 30 days. They aim for a manuscript of 50,000 words in this time, and have the full support of an online community in doing so.
 Similarly, Camp NaNoWriMo is an online community for writers. However, this initiative sees writers take a “virtual writers retreat”, where you can work on anything from poems to short stories to novels in a creative online environment every April and July.
2. Determine your preferred organizational method
The process of creating multiple drafts, weaving a storyline (or several), crafting engaging characters, and every other element of book writing is complex.
Even if you aren’t usually the type to write out a highly detailed outline, you will need to organize your thoughts and ideas, character arcs, twists, dramatic moments, and settings into some form of an outline.
Plotting vs Pantsing vs. Plantsing
This is around the time when most writers will find out if they’re a “plotter” or a “pantser”—two distinct novel writing outline methods.
Plotters are the organized type—they like to lay out all of the details of their plot from start to finish, and they probably own an array of Post-It notes.
Pantsers are named for flying by the seat of their pants—these writers like to let their story lead them, rather than the other way around, and largely make up their plot as they go.
Plantsers is a relatively new term, named obviously for people who still like an overarching novel outline, but don’t need it to be as detailed and thorough as the plotters of the world.
Each of these methods is valid, and what’s most important is what feels most comfortable to you. However, even if you are firmly in the “panster” camp, some organization throughout the process is a must.
There will always be room for off-the-cuff ideas and twists in your novel, but having a roadmap from the start will help you move through the process, and keep you on track when it starts to feel overwhelming.
How to write a novel outline
Outlining your novel will be key to your success, and there are countless ways to do it.
No matter the method, an outline serves to:
- Avoid plot holes
- Keep you focused
- Help you finish faster
- Ensure the storyline makes sense
- Let you work out of order
- Define your writing goals
Pantsers, you might not be looking to choose an outlining method per se, but you will still need some way to keep track of everything. This could be a spreadsheet to note down character details (such as appearance and traits), place-name spellings, and loose ends. Whatever works for you!
Let’s dive right in.
The Snowflake Method
One of the more popular routes in outline creation, the Snowflake Method, is the brainchild of author Randy Ingermanson. In this method, you start with a basic plot and expand it little by little.
To begin, write a one-sentence summary of your novel. Expand this into your “elevator pitch”, a short paragraph explanation. Next, expand that into a page, and so on and so forth.
Continue until you have a fully formed snowflake, complete with characters, plot points, problems, important scenes, and other details. If you want more details on how to write using the snowflake method, stay tuned—we’ll have a whole blog dedicated to it soon.
The Freytag Method
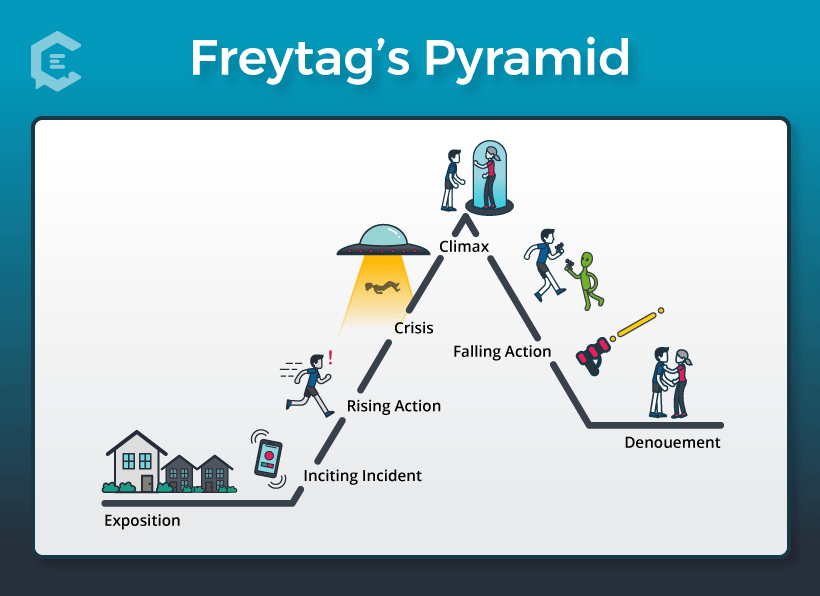 The Freytag Method mirrors a common story structure you have likely already seen: exposition, rising action, climax, falling action, and denouement.
This style, created by German novelist Gustav Freytag, allows for a basic level or organization and structure but leaves the finer points up to your imagination.
To follow this structure, you can essentially map the basics of your plot onto this structure, then begin writing, expanding each one until you have a fully formed manuscript.
The Chapter-by-chapter Method
This method is an obvious one, and it goes by many names, but none so transparent as the “chapter-by-chapter method.”
With this approach, you will come up with a title for each chapter, then note down key points or events for each chapter.
If the drafting process intimidates you, this route can be a good option as you’ll know you have everything in place to work through your first draft quickly.
It will naturally take longer to make an outline one chapter at a time, but it will make your draft faster and easier.
The Reverse Method
In the Reverse Method, the first thing you do is write the ending.
As soon as you’re happy with it, work backwards. Add a beginning, and fill in the major plot points that work towards this ending.
Knowing exactly how it all ends from day one will help you spend the entire story working towards those closing chapters.
The Draft Zero Method
Dyed-in-the-wool pantsers, this may be the method for you.
The draft zero method is also known as the “pantser’s compromise.”
Instead of an outline, you simply start writing. And instead of a full draft, you write 100-200 pages of ‘draft zero’—the draft that comes before a draft.
This method lets you fly by the seat of your pants, but still have a chance to work out plot holes and plan for writing devices with this quasi-outline.
No matter your planning style, once you feel as though you have prepared enough, it’s time to start the first draft. Before you dig in, make sure you understand what elements go into a good novel…
The 10 essential elements of a good novel
There are just 26 letters in the alphabet, and even though you’ve likely been familiar with them since you were a child, it’s surprising how daunting they can become when it’s time to start on your book.
That said, there’s only one real way to write a novel—one letter at a time.
Here are the elements of a good novel that you will need to remember as you work through your first draft.
1. Showing vs Telling
Note: Check out our full guide on mastering showing vs. telling.
It’s one of the most common writing tips across all forms of written work, but even then, there is still no way to understate the importance of showing instead of telling.
In fact, publishers will regularly turn down manuscripts simply due to too much reliance on telling. This style is dull for readers, and prohibits you from sharing a compelling and realistic world.
The good news is, even if you have created a habit of telling all of the time, it is something you can work on and improve with advice, practice, and great editing.
Learn how to kill those bad telling habits and share your story with the world by showing with our in-depth guide on how to master showing vs telling.
2. Story arcs and plot styles
All stories that have ever been told, from Hamlet to 50 Shades of Grey, fall into one of just a smattering of plot styles.
Also referred to as story arcs, these categories encompass a huge bulk of the tales told throughout human history—and some of today’s most popular novels fall into these categories as well.
Of course, there is some disagreement about exactly how many there are. Some observers note just seven, while others count as many as 20 or more.
In Christopher Booker’s (an aptronym if there has ever been one) The Seven Basic Plots, he covers nine overreaching plot types:
- Rags to riches (a commoner finds greatness)
- Comedy (a humorous, satirical, or happy-ending-style novel)
- Tragedy (the hero fails greatly and is perhaps destroyed in the end)
- Overcoming the Monster (the hero destroys a great evil)
- Quest (the hero goes on a journey for a great prize)
- Mystery (the hero attempts to uncover the truth)
- Voyage and Return (the hero discovers and loves a new world, but eventually returns)
- Rebirth (a character is trapped in a terrible situation, then freed)
- Rebellion Against “The One” (a hero rebels against an all powerful entity)
Some of these may resonate with you, or your novel may fall into more than one of these categories. Still others may not find that any of these archetypes fit, and that’s fine as well. No matter where you fall, however, you still need to have a beginning, middle, and end.
3. The beginning
Not only is the beginning vital to grabbing a publisher’s attention, the real test lies with your reader. In fact, many readers these days follow “The Rule of Fifty,” where if a book doesn’t grab them in the first 50 pages, they give up on it.

There are many ways to create a gripping beginning. Keep in mind that if you genuinely think it would appeal to you as a reader, it will likely appeal to your audience, too.
Here are a few techniques to try:
- Surprise, delight, intrigue, or terrify your reader in the very first line
- Begin in a scene, rather than with exposition
- Up the stakes with a big turn of events
- Establish your hero as relatable and likeable
- Don’t go into too much detail (you have a whole novel to add detail)
- Feature a cliffhanger in the first few pages
- Create an engaging setting
4. The middle
The middle of the story is often the toughest to write. Writers tend to know how they want it to begin and end, but the middle can be murky, and it’s common for the pace and intrigue to slow down in this section.
Here is a good time to fall back on your novel outline—this will help drive you through the middle of the story, include points of interest, and keep your reader hooked until the final payoff.
Try these novel writing tips:
- Create new complications or obstacles for your hero
- Write your character into a corner
- Add a sub-plot or two (that tie in to the main story arc)
- Change the setting
- Expand on minor characters
- Introduce a plot twist
5. The ending
The final act of your book is can be very exciting to write, but it brings its own challenges.
You arrive at the climax of the story arc, and as a writer, you start to see the light at the end of the tunnel. For these reasons, some writers will be tempted to rush through this stage, but it’s important to pay just as much attention, and give just as much care to this section as any other.
Here are a few ways to ensure a satisfying ending:
- Go for the heart—make your reader feel something
- Ensure the end is logical—any big surprises should still make sense
- Create a satisfying ending, even if your story is a sad one
- Complete your character arcs
- Leave something to the reader’s imagination
- Avoid clichés and cop-outs (a deus ex machina is generally considered a no-go)
6. Compelling characters
Your characters are the heart and soul of your story, and if your reader doesn’t care what happens to them, you’ve got a serious problem. Characters are often the most memorable part of a good book, so if you want to know how to write a novel that sells, focusing on characters is smart.
Realistic characters
One of the most important character traits is that every single one of them must be realistic. No hero is without their flaws, and it’s extremely rare that a villain is completely evil. Even Lady MacBeth and Nurse Ratched had their believable (if horribly misguided) motivations and character traits.
Likeable characters
Your characters must also be likeable. It should come as no surprise why so many heroines in romance novels love books—that’s a shortcut to ensuring the reader feels some familiarity with the protagonist. Similarly, that’s why so many protagonists have tragic pasts (Harry Potter and Batman), as feeling empathy for a character is an easy way to become attached to them.
Character flaws
Though your main characters should be likeable, they also must have flaws to make them realistic. No one is perfect, and a protagonist that has no weaknesses or dislikeable traits will likely bore your readers. Some flaws your characters might have to make them more interesting:
- Impulsivity
- Prejudice
- Dishonesty
- Extreme pessimism
- Blind optimism
- Awkwardness/poor social skills
- An unpredictable temper
- A sarcastic/cynical attitude
- A lust for power
7. Natural dialogue
Compelling characters also don’t speak like robots. If your dialogue is stilted or outright unrealistic, it will be tough for the reader to immerse themselves in the scene and make that connection.
8. Character arcs
Finally, the most compelling characters are those with arcs. A character arc is the transformation of a character throughout a story, and it can be a physical change, a shift in beliefs or values, a new personality, or practically anything in between.
From good to bad, bad to good, sad to happy, shy to sassy—so long as there is a believable and event-driven change in your character, they will likely be far more engaging than a one-note protagonist.
9. A supporting cast
Though there are some books out there that have only one or two characters, most books have a cast of characters to round out and reflect your leads. Secondary and tertiary characters can be anyone from your leads’ family members, friends, lovers or colleagues to complete strangers who somehow cross paths with your protagonist.
Though they will have less “air time” as your lead characters, they still must be compelling and as realistic as your lead cast. If you can’t find a way to make them realistic and valuable to the plot overall, then they will likely be cut by your book editor.
10. A strong setting
From jail cells to Jurassic Park, a good setting is a telltale sign of a strong novel. The backdrop of your novel can almost be a character itself if you describe it well and use it to help move the plot forward.
A novel setting doesn’t have to be outlandish and extreme—some of the best stories are told in suburbs, kitchens, and office buildings. But remember that your ultimate goal is to draw your reader into a brand new world—how you describe that world can make or break the reading experience.
Completing your first draft
With all the essential elements in place, it’s go time. Now comes the moment when you truly start fleshing out a draft, but first…
Choosing the right narrator
The rule of thumb in finding your narrator is to do whatever feels natural to you. The narrative style will play a key role in outlining your story, as it will be key in sharing information with the reader.
Here are the six main types of narrator:
First person
When your story is told from the perspective from one of your characters, usually the protagonist. Example: “I woke to the sound of someone banging on my door.”
Second person
A rare narrative style, second person speaks directly to the reader with the use of “you.” Example: “You woke to the sound of someone banging on your door.”
“You are about to begin reading Italo Calvino’s new novel, If on a winter’s night a traveler. Relax. Concentrate. Dispel every other thought.” – Italo Calvino
Third person
Similar to the first person, except ‘he’ or ‘she’ is used to describe what a character is doing, feeling or thinking. Example: “She woke to the sound of someone banging on her door.”
Omniscient
An omniscient narration style allows the narrator (usually not a character but more the voice of the storyteller) to know all things, tell the story from multiple points of view and share the thoughts and feelings of each character.
Dan Brown’s Da Vinci Code is a modern example of omniscient narration, as the reader learns what the characters are doing and thinking, and is also offered additional information outside of character movements.
Unreliable narrator
When a narrator either bases their telling of the story on incorrect information or assumptions, or purposefully deceives the reader.
Consider Vladimir Nabakov’s Lolita. Narrator Humbert Humbert constantly justifies his shocking acts with his own misguided views on other characters in the novel, making him unreliable in offering an accurate retelling of events.
Observer
When a narrator is either first or third person, but is not part of the major story. This narrator is also sometimes known as a witness.
A famous example is The Great Gatsby. Narrator Nick Carraway is Gatsby’s neighbor, but not as central a character in this novel such as the likes of Jay Gatsby or his cousin Daisy Buchanan.
Choosing your tense
Your tense is the when of the story. Is it happening as the reader turns the page, or is it happening in the past?
- Past tense is often the default tense, and while it is not intrinsically better or worse than present tense, it is often seen as the easiest for new authors.
- Present tense is less common, and again neither better nor worse than past tense. It is more commonly used for novels with a lot of action (think Hunger Games).
- A mix of tenses is also an option. Your novel can be set in the present tense, with flashback chapters in the past tense.
Either way, it’s extremely useful to decide on your tense before you start writing. Changing from one to the other half way through a novel can take a lot of time to alter after the fact.
Writing the damn thing
Once the planning stages are complete, the toughest part about novel writing is simply sitting down and getting it done.
Your only goal: write every day.
There are some methods you can use to help yourself stick to a daily writing schedule:
- Book writing time into your calendar
- Choose the time when you feel most motivated, whether that be first thing in the morning or just before bed
- Switch off your phone
- Block your social media (apps such as Offtime can help here)
- Make handwritten notes instead of digital ones
- Write in a non-linear fashion (write a scene from the middle or end of the book if you feel more interested/engaged in that scene)
- Change your setting (writing in a coworking space or café instead of at home)
Don’t forget that this first draft is just that, a draft. No one will see it but you, so it doesn’t matter if that sentence is a bit cliché, or that piece of dialogue isn’t sharp enough.
Editing comes later. For now, all you need to do is keep writing. Even if you don’t want to work on the novel you have in mind, you still should take time to write. Scribble notes in a journal, work on a completely different story, write a love letter to your partner—whatever it takes, put pen to page every day.
From first draft to second draft (and beyond)
With your first draft in front of you, take a moment to breathe and pat yourself on the back. The groundwork is done.
Now it’s time to polish and perfect that manuscript into something to show the world.
Defining your self-editing style
When it comes to editing, whatever works for you is the best route to take.
Some will edit as they go, while others will just focus on getting words on paper. Some will work in chronological order, while others will edit what they feel like that day. No matter what your groove is, find it and stick to it.
Edit as you go
This style means writing a sentence, paragraph, or page, then editing it immediately. It has the benefit of being able to move on knowing you have improved your work already, but it can slow you down if you spend too much time reworking your words straight away. If you find yourself getting upset about your own words, or fighting the urge to delete huge paragraphs of text, it may be best to put off editing before you get lost in a self-editing dead end.
Edit in sections
This style means editing in any kind of section. This could be a chapter, a scene, or simply everything you wrote the day before. This route allows you to get your words on paper quickly without fussing about minor issues, but also gives you time later to tidy things up before moving on to the next section.
Edit at the end
Editing at the end is often preferred by those who simply want to write the draft and get that part of the work tidied away. This allows you to write a draft more quickly; however, it can mean that you miss plot holes or other issues that you would have spotted sooner otherwise.
Self-editing is a vital part of writing your book. While it’s important to be kind to yourself and not simply delete huge swathes of writing, it’s also key to go through your work before handing it over to a professional editor.
This ensures your editor doesn’t spend their time (and your money) fixing basic mistakes and finding obvious plot holes, too many examples of telling instead of showing, and other things you should be able to spot—and edit—yourself.
You can use your own knowledge, as well as online tools and editing apps to make this essential first edit.
Here are a few simple things to watch for as you edit:
- Convoluted words where simple words would do
- Typos you regularly make
- Filter words that clog up your language
- Telling vs. showing
- Unnecessary information and over explanation
- Cliché sentences
- Overused words
Need more help? Learn how to edit your own novel in our comprehensive guide.
Alpha readers vs. Beta readers
You’ve finished your first draft, given it a strong edit, and you’re ready to show it to someone.
However, the next step is not a professional edit. Instead, seek feedback from peers and workshops for another check. This stage of editing is typically taken on by alpha readers and beta readers.
Alpha readers are the very first to read a draft. They are often very close to the writer, and are absolutely trusted by the writer to read those words even before they are polished. An alpha reader’s job is to check for any major glaring errors or plot holes and provide feedback.
Beta readers come in at a later stage, usually after the first draft has been self-edited and seen by alpha readers. A writer will often have specific questions for a beta reader, such as whether the reader believes the dialogue is strong enough, or if a character’s motivations are clear. They could be a friend or family member, or even a stranger with an interest in writing or editing. Their job is to provide feedback from a final reader’s perspective.
How to handle feedback
Taking on feedback is easier said than done. You’ve probably spent months or even years on this draft, so it can be a raw and uneasy feeling to hand it over for criticism.
You will need thick skin. And you will also need to ask more than just your friends and family to ensure you receive any brutal truths that you need to hear.
To get the most out of your beta readers, you should also prepare a few in-depth questions to ensure your draft is clearly understood, and that any areas you are unsure of are addressed.
A variety of opinions is ideal, but it’s also important to trust yourself and make judgments about which pieces of feedback to ignore, and which ones to take on board. Finding patterns in your feedback is often a good indicator that something needs to change, but if you’re not sure, make a note to ask your professional editor about it.
Now it’s time for a professional editor
A professional edit can take your manuscript from good to great, or from great to excellent. It can be the cherry on top that helps you catch the eye of a publisher, or simply ensures your online reviews will focus on things other than how many typos there were in your manuscript.
Ready to lose the errors but keep your voice? Submit your work to the team at Invisible Ink Editing for a free sample edit, and a quote for the full manuscript.
How to prepare your manuscript for an editor
There are a few quick tasks you can complete to prepare your manuscript for a professional edit.
Firstly, run a spell check one final time—it’s always hard to see your own errors, but another check may pick up a few more.
Next, be sure to use standard editing format. We will soon have a full formatting guide, but for starters make sure your manuscript has:
- 12-point font
- An easy to ready typeface (Times New Roman is fine)
- 1.5 or double line spacing
- Single spaces after periods
Notes for your editor
Prepare a few notes that your editor can read before starting the manuscript, so they know a little about what to expect, and so they’re aware of any questions you may have. Your notes should contain:
- The synopsis of the novel
- The manuscript’s history of editing (who has read it, how many times it has been edited)
- Any questions or concerns you have (put them in a separate document so your editor can read them before, or leave them until after their first read)
To see exactly what happens (or should happen) at each stage of the editing process, read our six-step author’s guide to the editing process.
Final thoughts
As soon as you hit that submit button, it’s time to relax, treat yourself to some time away from the keyboard, and wait for your editor to get back to you.
There will be more work to come once your editor responds, including dealing with changes and edits, and then taking the next steps toward publication.
We will soon have guide on getting published, but for now, know that Invisible Ink Editing is with you every step of the way.

2 replies on “How to write a book from scratch”
I am a 63 year old first time writer. I find that I get too bogged down in writing prep and lose confidence in my writing.
John, you might be a pantser. I used to believe I was a plotter, but really, I only get a few must have ideas and an ending in mind for my story. No matter how much I try to plan. I then just start writing towards those ideas and edit it all once I’m done. I think the more you do this the more you’ll understand what you need to become a more efficient plotter if that’s where you find comfort. But for now it sounds like plotting saps your confidence and that isn’t great.
Lean in on a good idea and just write! See where that takes you and enjoy the process. The feeling of momentum when writing is wonderful.